Monday, February 27, 2012

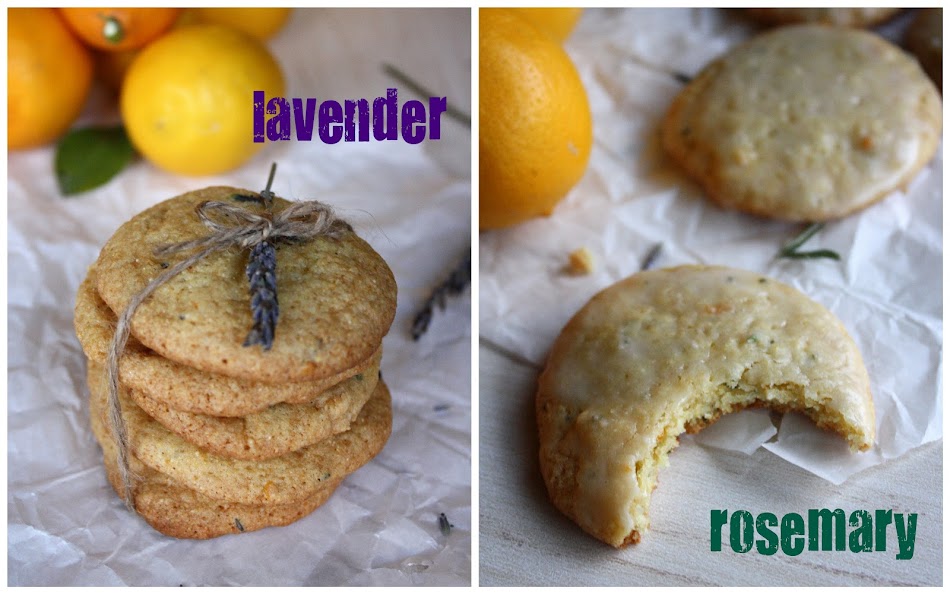
Lavender and Rosemary Lemon Cookies

My Oma just celebrated her 90th birthday. In case you don't remember, my Oma—or grandma—is this awesome woman, of paprikash fame. And now she's 90. Ninety!! What a crazy life she's led, and what an amazing family she's built. 


We spent the night of her birthday party dancing the polka, and taking shots. Lots of shots. That European side of the fam sure can drink! Evan went with me, and met Oma, and the rest of my dad's family, for the first time ever. They loved him, of course. Especially after he wore Uncle Ernie's lederhosen. The whole thing was totally crazy, and totally wonderful. 


Oma lives in Southern California, so we also got to soak up some sun. We drove through citrus orchards, and picked a million meyer lemons and kumquats from her back yard. Seriously, the woman had an insane amount of citrus just weighing down her trees. And now I have an insane amount of citrus in my home, here in dreary Seattle. I really have a million lemons, or at least 30. My bag got searched at the airport because of it. Don't worry, they didn't confiscate my lemons. Or my kumquats. Close call. 


There's nothing like a bowl full of bright yellow lemons to brighten up a cold, dark winter!


Meyer Lemon Cornmeal Cookies with Lavender or Rosemary
Adapted from Cooking Light

These cookies seriously summer in every bite. They're sweet, tangy and herbaceous, and they really hold up to a bold cup of Earl Grey (or a bowl of vanilla ice cream). The lemons and rosemary for these came from Oma's yard, and the lavender came from my parents' yard.  

1 cup all-purpose flour 
1/3 cup yellow cornmeal
1/2 teaspoon baking soda
1/4 teaspoon salt 
3/4 cup sugar
6 tablespoons butter, softened 
2 tablespoons honey
1 large egg 
1 tablespoon meyer lemon zest
1 tablespoon meyer lemon juice
1 teaspoon finely chopped fresh rosemary
1 teaspoon finely chopped lavender buds 
Glaze:
1 cup powdered sugar
fresh meyer lemon juice

Preheat oven to 350, and line 2 baking sheets with parchment paper. 

Whisk to combine flour, cornmeal, baking soda, and salt in a bowl. Combine sugar and butter in a large bowl/stand mixer, and beat about 5 minutes, until light and fluffy. Add honey, and beat until combined. Add egg, beat well. Mix in lemon zest and juice. Add dry ingredients to wet, and mix until just blended.

Separate dough in half, and mix lavender  into one half, and rosemary into the other. Spoon small rounds of dough onto baking sheets. Bake at 350° for 10-12 minutes, until golden brown around the edges. Cool until firm enough to move from pan, and then cool completely on rack. 

For glaze, stir together powdered sugar and a tablespoon of lemon juice. Add more juice until desired consistency. Once cool, dip tops of cookies into glaze, and let sit until glaze dries. Then eat, preferably with tea. 


SHARE:

Friday, February 24, 2012

Rise and Shine: Whole Wheat Blackberry Coconut Scones


I steal the covers every night. I must swim in my sleep. Or at least doggy paddle. I really can't figure out how they get so turned around each night. And how they all end up on my side, while Evan lies there shivering. Monday through Friday, I set 5 alarms each morning. Seriously, 5. In ten minute increments. I turn them all off—one by one, every ten minutes—and go back to sleep. And then I tell Evan that I'm getting up in 5 more minutes. Just 5 more minutes. This carries on until he has no choice but to get up and shower first, to avoid being late. And then I rush him, because, well, at that point, I'm usually running late myself. 


For the most part, he's a good sport. That's why I try to get up earlier on weekends, and let him sleep in. With all the blankets to himself, and no annoying buzzers. It also gives me time to make breakfast. There's nothing better than waking up to the scent of something delicious sizzling or baking, coffee brewing. 


Weekend breakfast, served. After five days of dealing with my blanket thievery and alarm clock marathon, It's the least I can do. 

Whole Wheat Blackberry Coconut Scones 

1 1/2 cups whole wheat flour
1 cup all-purpose flour
1 tablespoon baking powder
1 teaspoon salt
1/2 teaspoon cinnamon
1/4 teaspoon fresh ground nutmeg
1/2 cup unsalted butter, cold, cut into small cubes
2 eggs
1/2 cup cold half and half
1 teaspoon vanilla
1 cup fresh or frozen blackberries (do not thaw if frozen)
1/2 cup shredded, sweetened coconut

Egg Wash
Whisk together the following: 
1 Egg
1 Tablespoon water
pinch salt
A few tablespoons raw sugar

Icing
1 cup powdered sugar
1/2 teaspoon almond extract 
Half and half 

For Scones:

Preheat oven to 350. 

In bowl of stand mixer, combine flour, sugar, baking powder, salt, cinnamon, and nutmeg. Blend butter into dry mixture, with a pastry blender, your hands, or your paddle attachment, until butter pieces are a little larger than 'pea-sized.' 

Whisk together the eggs, half and half, and vanilla, and add half of it to the dry mixture. Mix gently until just combined, and add remaining liquid. The dough might look a little shaggy, that's ok. Gently fold in coconut and berries.

On a floured surface, pat dough into two equal sized rounds, about an inch and a half thick (should be about 5 inches around). Brush surface and sides with egg wash, and sprinkle with raw sugar. Cut into 6 wedges. 

Place wedges (not touching) on a parchment lined baking sheet. Bake for 10 minutes, rotate pan, and bake for another 10-15 minutes, until golden. 

Once cooled completely, drizzle with icing. 

For Icing:

Whisk together powdered sugar, almond extract, and about a tablespoon half and half. Add more half and half until you reach desired consistency. Add more sugar if it gets too thin, more half & half if its too thick.

I referenced the Grand Central Baking Book for key ingredient measurements of a basic scone recipe (ratio of dry to wet ingredients), and a general 'scone how-to,' but my recipe is so different from that one, that I wouldn't even call it an adaptation. You should, however, pick up a copy of that book, or go into Grand Central Bakery if you get a chance. Their oatmeal chocolate chip cookie is one of my all time favorites!
SHARE:

Tuesday, February 14, 2012

Happy Happy Love Love + Pudding

Sometimes a scent or a taste brings you back to some other time and place. Have you ever had one of those moments, where the lick of an icy popsicle transports you to childhood summers, playing outside by the little inflatable pool? I have those moments all the time. I also have a crazy-good memory (trust me, I know what you wore on this day in 1995), so my memories play out in a little more detail than some. 


Amanda, for instance, hardly remembers what she did yesterday. I guess I'm here to keep the story of our childhood alive. We regularly have conversations that start with me saying "remember that time, I was probably 6, you were 8…you were wearing….we were eating those…and then I said… do you remember?" She rarely does. I wonder if she remembers that time we begged our parents for candy, we must have been at a Mexican grocery or something, and the only options were those spoons with tamarind goo on them, or weird little tamarind baby-bottles. That's what I got, and it ended up being super spicy. I cried. I mean, I was kind of a cry-baby, but still. Who makes spicy candy look like a baby-bottle!? That's just crazy. To this day, I remember how it tasted. That was probably about 22 years ago. 


For some reason, this chocolate pudding is one of those things that brings back a flood of memories for me. The recipe was published in the February 2009 issue of Gourmet. That Valentine's day, Evan came over to my old one-room garden level apartment. We made an unbelievable amount of sushi together, and ate it in the living room, watching Nip Tuck. I think we watched like 2 full seasons that day. Then—even though we were so full of homemade sushi we could barely move—we ate the entire bowl of pudding, with whipped cream and strawberries. I was wearing a red shirt. Like I said, I remember details. 


I guess there are probably other amazing chocolate pudding recipes out there, but I just keep coming back to this one. And every time, it makes me think of Valentine's day. And Evan. I love that. I love him. And chocolate pudding. 


SHARE:

Sunday, February 12, 2012

Nose to Tail: Rainbow Chard

Nose to tail means using every part of the animal—not just the prime cuts—from the nose to the tail, and everything in between. Similarly, you can try to make the most of your produce by using pieces you would normally toss out. 


I've been getting a new bunch of greens—chard, kale, collards—in my CSA every week. While I love tossing braised greens in a bowl of quinoa and topping with a fried egg, or throwing them into a soup, Evan despises them. I've been trying to come up with something new, especially for the rainbow chard, that he would also enjoy eating. I think this is the best way to get him to keep picking up the CSA box for me every Tuesday.  


I wanted to do something fun with the leaves, and also with the vibrant rainbow stems that I usually toss out. I know that you can use rainbow chard stems in pretty much any recipe you use the leaves, but I'm generally not looking for that solid crunch in the dishes I make with greens, so in the garbage they go. 


With my latest bunch of rainbow chard, I decided to make chips with the leaves, like kale chips, and to do a quick pickle with the stems. This was an awesome idea, because you get two different snacks with one bunch of rainbow chard. One salty, crispy snack, and one tangy, crunchy one.  


Chard Chips

1 bunch rainbow chard
1 tablespoon olive oil
1 squeeze fresh lime juice
Pinch cumin
Sea salt

Preheat oven to 350°F. Whisk together oil, lime juice, and cumin. Rinse and dry chard leaves, and remove the center stems (set aside stems). Cut each leaf into large pieces and toss with olive oil mixture. Arrange leaves in a single layer (not touching) on a baking sheet and sprinkle with salt. I actually did several rounds, because I didn't want too many sheets creating steam in the oven. Bake for 10-15 minutes, or until crisp. I checked them after about 6 minutes and flipped them. Move to a rack to cool. 


Quick Pickled Chard Stems
Stems from one bunch of chard should make one to two 1/2 pint jars. You should make enough brine to completely cover stems, so you may need to adjust amounts based on how many you have. This made one 4oz jar, with about a half cup of brine left over. PS. this brine tastes so amazing I had a hard time not just drinking it straight out of the saucepan.  
Stems from 1 bunch rainbow chard
1/2 cup water
1/2 cup vinegar (I used a mix of rice vinegar and apple cider vinegar)
2 teaspoons salt
2 teaspoons white sugar
1/2 teaspoon cumin seeds
1/2 teaspoon peppercorns
2 cardamom pods, gently smashed

Cut stems into equal size matchsticks, the height of your small jar (or, just into pieces that all fit in your jar). In a saucepan, whisk together everything except the chard, and bring to a boil. Pour brine over stems to cover, and let sit to cool to room temperature. Once cooled, cover and place in fridge. Let brine at least over night to soak up the flavors, and eat within a week. 
SHARE:

Wednesday, February 8, 2012

Chocolate Lava Love


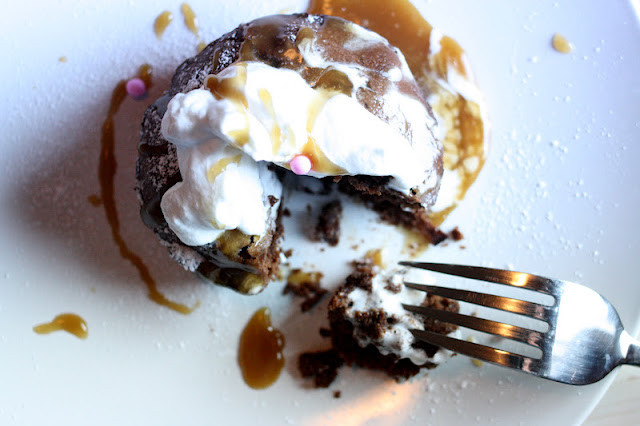
This cake is supposed to have molten chocolate lava oozing out the center. Because, well, molten chocolate lava is romantic and sexy. And if you're making molten chocolate lava cakes for your sweetie for Valentine's day, you want to up the sex appeal. You could also bake this cake while wearing nothing but an apron and heels… or an apron and work boots, for all the romantic guys that are reading this. Yes, that. I love a man in an apron. Wait, where was I? 


Oh yeah, lava cake. It sounds dangerous—to bake in the buff—and kind of uncomfortable, but your Valentine will like it. Trust. He or she won't even care if there's lava or not. Champagne helps too. 


I didn't care if there was lava or not either, because I wasn't going for hot and steamy. I made these molten chocolate lava cake with a gal-pal, not my sweetie. Tasha came over to whip up some sweet treats in preparation for Valentine's day. It's her first Vday as a wife. Romantic, right? I know, that's why I wanted to be there for it. I mean, actually there, on Valentine's day. We're double dating…I'll probably sit between them. Super sexy. The good news is, you don't need just one special day to be romantic with your sweetie. Surprise that lucky guy or girl with a molten chocolate lava cake on a totally random night, and desired results will be achieved. 

Note to Evan: The way to this girl's heart is pulled pork. Ok, pulled pork and diamonds. Just sayin.   

Chocolate Lava Cakes

Adapted from McCormick 

4 ounces dark baking chocolate, broken in pieces 
1/2 cup  butter
1 tablespoon brandy (or a flavored liqueur, or wine)
1 teaspoon vanilla  
1 cup powdered sugar
2 eggs
1 egg yolk
6 tablespoons flour
1/4 teaspoon cinnamon

Optional toppings:
powdered sugar
whipped cream
fancy pink candies or sprinkles

Preheat oven to 425. Butter 4 custard cups or 4 muffin tins. 

Heat chocolate and butter together, either for a minute in the microwave, or in a double boiler, until butter is melted. Whisk together until chocolate is melted. Whisk in brandy, vanilla, and powdered sugar. Stir in eggs and extra yolk until combined. Stir in flour & cinnamon. Evenly divide batter among muffin tins. 

Bake for 9-12 minutes, until sides are firm and centers soft. Take heed—I baked 13 minutes, which resulted in not having a runny lava center. They were, however, still extra delicious, lava or lava-less. 

Loosen edges with knife, and remove cakes. Sprinkle with powdered sugar, caramel sauce, and whipped cream...and little pink candies. 


SHARE:

Monday, February 6, 2012

A Lil' Cabbage Bacon Love


Maybe it's because of my eastern-European roots that I love cabbage, and because of my Oklahoma blood (on my moms side) that I love bacon (my grandma Carol cooks everything in bacon grease…we even have a family recipe for salad smothered in warm bacon grease dressing, but that's for another day). 


Or, maybe it's just that these two things effing rock. Which they do. Especially together. And even more especially when you add little gems of mini cabbage heaven—Brussels sprouts—to the mix. And triple, no, quadruple that especially by throwing in some sour cream and lemon. You heard me. Cabbage, bacon, Brussels, sour cream, lemon. And the bacon is actually pancetta, fancy-town. Oh, and I'm talkin' about soup. I know! Life=complete. 


Cabbage and Potato Soup with Crispy Topping & Lemony Cream
Adapted from Bon Appétit 

1/2 cup sour cream
juice and zest from half a lemon

2 tablespoons butter
1 tablespoon olive oil
1/2 head of green cabbage, chopped
1 large onion, diced
3 cups peeled and cubed potatoes 
1 bay leaf
6 cups (or more) chicken broth
1 sprig fresh thyme 
salt and pepper

1 cup thinly sliced brussels sprouts
2 1/4th inch thick slices of pancetta, diced small*
olive oil
salt and pepper

Whisk sour cream, lemon juice, and zest l in small bowl. Cover and chill. 

Melt butter and olive oil in a large pot over medium-high heat. Add cabbage and onion, and sauté until just tender but not brown, 6 to 8 minutes. Stir in potatoes, add bay leaf and thyme. Add broth; bring to boil. Reduce heat to medium-low; cover and simmer 20 to 25 minutes. 

Meanwhile, preheat oven to 400. Spread brussels and pancetta on a sheet pan, and light drizzle with olive oil. sprinkle with salt and pepper. Roast in oven until pancetta is crispy and brussels are slightly charred but not burnt. Keep an eye on it, it could take anywhere from 5-10 minutes (and you may want to give it a stir after a few minutes). Remove from one and set aside. 

Discard bay leaf and thyme sprig from soup. Using immersion blender (or regular blender, working in batches), puree until smooth. Simmer until heated through, adding more broth if soup is too thick. 

Top each serving with some of the crispy brussels and pancetta, and a hearty dollop of the lemony sour cream. 

*I get the 2 pieces of pancetta from the deli/meat counter. You can get exactly as much or little as you need, just thick enough, without paying a million dollars. 
SHARE:

Thursday, February 2, 2012

Cheeseburger Chimichangas


Superbowl time! Who cares about the football game (oh, you do? sorry)… I'm in it for the food. Superbowl Sunday is one of the greatest junk food holidays of the year. It's pretty much the only day of the year that I'll eat chicken wings AND nachos in the same day. I mean, really, it's pretty much the only day of the year I eat chicken wings, period. These mini-baked-cheeseburger-chimichangas are perfect Superbowl food. I mean totally made for this occasion. Or maybe a 6 year old's birthday party. Whatevs. Like cheeseburgers? Me too. Like tortillas? Of course you do. Put them together, and you're all set for the big game.


Mini Cheeseburger Chimichangas (baked)
Makes 8 chimichangas

1/4 of an onion, diced small
1.5 lbs lean ground beef
pinch granulated garlic
1 tomato, diced small
3 medium-sized dill pickles, diced
1/4 cup ketchup
1 tablespoon mustard
salt & pepper
1.5 cups grated cheddar cheese
8 small flour tortillas (the 'fajita size')
olive oil

Preheat oven to 350.

Heat a large skillet over medium, drizzle a bit of olive oil to coat, and add onion. Sauté until just starting to brown, and add beef and granulated garlic. Cook until beef is almost cooked through, and drain off excess liquid. Add tomatoes and dill pickles. Cook until beef is all the way done, and tomatoes have basically melted into the mixture. Add salt and pepper to taste, and stir in mustard and ketchup. Taste, and add more seasoning if desired. Remove from heat, and stir in cheese.

Prior to rolling, you'll want to heat your tortillas. You can do this a few at a time in the microwave for 10 or so seconds, or wrapped in foil in your oven while it preheats. Just make sure they're soft and pliable. Add filling to center of tortilla, fold in edges, and roll from bottom to top. Arrange on a  greased sheet pan, fold side down (they should hold form if you set fold side down). Bake for 10 minutes, or until bottom side is golden and cripsy, and flip. Bake for another 10 or minutes, until both sides are golden and crispy. Serve with mustard and ketchup (or you can get fancy and go the fry-sauce route). 


SHARE:
© Loves Food, Loves to Eat. All rights reserved.
Designer Blogger Template by pipdig